Thursday, December 5, 2019

Advance Restaurant features

This blog cover some advance Datio POS restaurant features including the following.  These features are available in version v2.21.3 or greater like v2.22.5.

1.  Joining Orders.  Take one order and join it with a second order to create one.  An example maybe kids and adult tables were two tabs and you want them to pay together.  Join the tickets.

3.  Split Order.  It is very simple to split a check wtih Datio POS in half, thirds, or any dollar amount.  But let us say a table wants to split based on what each person ordered.  This feature will allow you to do this.

2.  Large Party Tip.   Some restaurants like to add a default tip such as 20% for tables of 8 or more.  This feature lets you do this.

Joining Orders


First, create order and save it by pressing "Save Order."  Then go to "Order List"


Swipe to the left on the order to pull up the options of Join, Split, Delete and Edit.  Click on Join.


Now you see a pop up that says, "Click on order to join with Order 1234567890."  Hit "Ok," then select the order you want to join.  Now you have 1 order instead of two.  The orders are joined.

Split Order

Similar to "Join Order," go-to the order list and swipe to the left to get the options as shown below.  Click on "Split Order"


When you click on "Split Order," you will see below.  Click on the actual items to move them from Original Order to New Order.  You can click on an item in New Order to move it back to Original Order.  Once you have the Orders set like you desire hit save as shown below.


Large Party Tip

Large Party Tip is a feature used to be able to automatically set the tip on large parties.  First you need to set up the feature.  Go to Extras in the App, then Custom Set Up and then Large Party Tips as shown below.


Now Turn on Large Party TIp and set the number of people that makes a large party for you and set the default Tip.  For example, enter 18 for 18%.


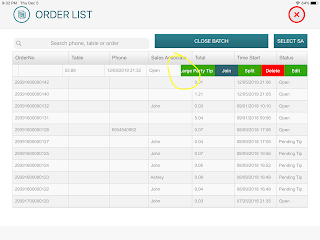
Once this is set up follow these steps to mark an order as Large Party Tip.  Go to Saved Orders.  Swipe left on the order to bring up the order options.  Select Large Party Tip as show below.


After selecting Large Party Tip you will get the pop up shown below.  Select Add Tip.  The 18% is added to the order and will print on the receipt.  The customer can add an additional tip.


Sunday, July 28, 2019

XZ Reports, X Report and Z Rest Report

Datio POS XZ Reports, X Report, and Z Rest Report

X and Z reports are common industry types of reports.  These types of reports are older than you and I.  They were originally used in cash registers without central processing computers.  The iPad is a great computer with a powerful memory and processor.  Below, I will explain both X and Z reports.

Datio POS has great online reports.  We keep the reports as long as you are paying your monthly subscription fee (and sometimes even longer just in case you need them).  Go to our blog to learn about our powerful reporting.

XZ reports are to capture sales from a specific register.  If you are using 2 or more registers to get the data you need to run the report from all registers.  To look at combine sales for the day simply use the basic report from manage.datiopos.com.  From our reports you can select any day or days, months or years.


Below is an example of the XZ reports.  To run the XZ report go to Extras,  XZ Report.  You will see the sales and can print and email the report.  Note the time on the top.  The report will reset after 3 days.  Most people that use this report, reset every night, morning or shift change.  The report is commonly used to check cash in the register at the end of a shift.  X report is the sales from the last reset,  you can print this and come back to see any additional sales.  Z report is the same but Z report will reset the count.


Below are 3 printed examples.  Example 1, I ran the X report.  This showed all sales on this register from 7/26 midnight to 7/28 at 11:00 am.  Example 2, is the same report from 7/26 midnight to 7/28 at 11:10 am, you can see sales between items 1 and 2 are the same because I didn't do any sales between running the reports.  Item 2 below was a Z report so sales where reset, as you see in the 3rd printout after running the Z report sales, are $0.00.


End.

How to Categorize Your Items

How to categorize your items.

Datio POS uses colors to categorize items.  When creating an item you can select the color.  Maybe you can set up red for all your drinks, blue for your lunch specials, and yellow for your sandwiches.  Below are the steps to use colors to sort your items.  We have 11 default colors and with additional colors you can have a total of 45 color catagories.

First create an item by selecting +Add Item on the home menu or hold your finger on an item to edit the item.


After you have assigned a color to all your items then searching or looking at just those items in that color is easy.  Simply select on the colors on the left hand side.  You can select just Red or Red and Blue as an example.  To clear the sort slect the color again to clear.


To increase the number of colors from 11 to 45 go to Extras, Custom Setup, and Colors and turn on Additonal Colors.  Be sure to hit the Save button.


After turning on Additional Colors, on the home screen you will have a new color option.  Select this then the color you want to see.  Select it again to add another color to your sort or unslect that color.


End.

How to Sort Items on the Home Screen

How to sort items on the home screen.
To learn how to add items to the home screen follow the link.

Items by default are kept in order in which you added them.  The items run top to bottom then left to right.  After the first page has filled another page is added, simply swipe to go from page to page on the home screen.

We have four options to sort items.  The first method is the default and is sorted by Time when the item was added.  The second method is by Item Name or alphabetically.  The next is by Price, low to high.  The fourth option is to sort by Sequence ID.  This method can allow you to sort in almost any manor and is discussed below.

To change the sort method go to Extras, Custom Setup, and then Item Sorting.  Pick the method you want, you can always change back.


To use Sequence ID turn on this option as mentioned above.  Now you have to go to each item and select the sequence number, you can use 1, 2, 3... or 10, 20, 30.  Remember to edit the item or item Sequence, simply hold your finger on the item.  By using 10, 20, 30 you can always insert an item in the order by making the item with a Sequence ID of 11 or 23 as an example.


End.


Wednesday, May 29, 2019

Employee Management and Time Cards

EMPLOYEE MANAGEMENT
Employee management has two aspects.  First, we offer user control, this is managers and employees. Using this feature you will limit employees from the Extra items like adjusting prices and access to custom set up.  The second part of employee management is employee time tracking.  Below are the steps to accomplish both.  Please note employee management is an additional $26 per month.

BASIC SET UP
Go to EXTRAS then Custom Setup


Then go to Sales Associates, we need to set up your employees, owner and/or managers.  You need at least one manager and one employee.  Save your adds when complete.


Now lets go to EXTRA, Custom Setup, Employee Settings and then Employee Management.


You should see the two or more employees you added in Sales Associates here.  You need to assign roles.  You need at least one manager and one employee.  Enter a 4 digit PIN.  Write these down, don't forget them.  If you do, call us at 408-643-0990.

Employees will be locked out of EXTRAS and from doing refunds, manager PIN will be required for refunds after this setup.


TIME CARDS
Time cards are a great way to track your employee's working time.  Employees will use their PIN to clock in and out.  Only you can adjust time like a missed break or someone forgetting to clock out.  Below are the steps.  First, you have to turn on Employee Management as described above.  Time cards are best viewed for payroll from our cloud at manage.datiopos.com.

First you need to enable Time Cards.  Goto EXTRAS, enter manager PIN, Custom Setup, Employee Settings, Employee Managment and then turn on TIME CARD AND ROLES.  Save and exit.


Now let's show how to clock in, goto EXTRAS then TIME CLOCK.


Notice the TIME CLOCK FOR John, as I used my PIN for John to go to EXTRAS, TIME CLOCK.  Simply Clock in and Out here.


Now let's talk about how to adjust someones time card.  Only a manager can adjust time cards.  Goto EXTRA, Custom Setup, Employee Settings and then Time Adjustment.  Pick the employee to adjust the time.


To edit an entry swipe to the left, then hit "Edit."  If you don't see the days you are looking for update the range.  You can also use the "Add" button to add a working time via a In and Out.


For Reports go to manage.datiopos.com from our computer.  On the left pick reports and employee.  Then make sure you select the Range you want to see, like the work week 5/1-5/8 or other to see the total time for that Range.  Select the employee to see the total time.

  
Any questions feel free to call or text us at 408-643-0990 or email at support@datiopos.com. Learn more at www.datiopos.com

Thursday, May 16, 2019

Accept Check Payment

ACCEPT CHECK PAYMENT

We have added a new form of payment for our merchants, you can now accept Checks on Datio Base Stations.
This feature is not turned on by default in the application, you have to call us to have it enabled for no charge.
If you are interested in using this please send us an SMS at (408) 643-0990 and we will turn this option on your account. Learn more at www.datiopos.com